Aperture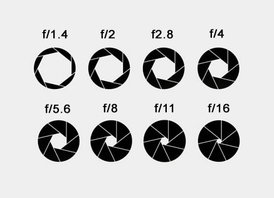 If you can master aperture you put into your grasp real creative control over your camera. In my opinion – aperture is where a lot of the magic happens in photography and changes in it can mean the difference between one dimensional and multi-dimensional shots. 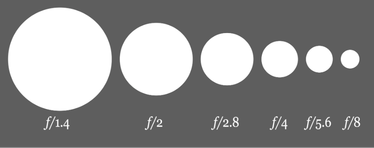 What is Aperture?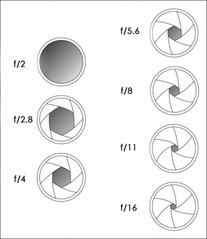 Put most simply – Aperture is ‘the opening in the lens.’ The iris of the lens that controls the size (diameter) of the aperture is called “diaphragm” in optics. The sole purpose of the diaphragm is to block or stop all light, with the exception of the light that goes through the aperture. When you hit the shutter release button of your camera a hole opens up that allows your cameras image sensor to catch a glimpse of the scene you’re wanting to capture. The aperture that you set impacts the size of that hole. The larger the hole the more light that gets in – the smaller the hole the less light. Aperture is measured in ‘f-stops’. You’ll often see them referred to as f/number – for example f/2.8, f/4, f/5.6,f/8,f/22 etc. Moving from one f-stop to the next doubles or halves the size of the amount of opening in your lens (and the amount of light getting through). Keep in mind that a change in shutter speed from one stop to the next doubles or halves the amount of light that gets in also – this means if you increase one and decrease the other you let the same amount of light in – very handy to keep in mind). One thing that causes a lot of new photographer’s confusion is that large apertures (where lots of light gets through) are given f/stop smaller numbers and smaller apertures (where less light gets through) have larger f-stop numbers. So f/2.8 is in fact a much larger aperture than f/22. It seems the wrong way around when you first hear it but you’ll get the hang of it. Smaller number = bigger aperture = more light & bigger number = smaller aperture = less light Depth of Field & Aperture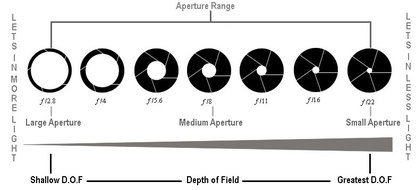 Depth of field is a by-product of aperture. The size of aperture has a direct impact on depth of field. There are a number of results of changing the aperture of your shots that you’ll want to keep in mind as you consider your setting but the most noticeable one will be the depth of field that your shot will have. Depth of Field (DOF) is that amount of your shot that will be in focus. Large depth of field means that most of your image will be in focus whether it’s close to your camera or far away. For example the landscape shot above has an aperture of f/16 and the result is that both the mountain in the background and the boats in the foreground remain in focus. Small (or shallow) depth of field means that only part of the image will be in focus and the rest will be fuzzy. Aperture has a big impact upon depth of field. Large aperture (remember it’s a smaller number) will decrease depth of field while small aperture (larger numbers) will give you larger depth of field. It can be a little confusing at first but the way I remember it is that small numbers mean small DOF and large numbers mean large DOF. Different Styles use Different AperturesMost landscape photography you’ll see small aperture settings (large numbers) selected by photographers. This ensures that from the foreground to the horizon is relatively in focus. On the other hand in portrait photography it can be very handy to have your subject perfectly in focus but to have a nice blurry background in order to ensure that your subject is the main focal point and that other elements in the shot are not distracting. In this case you’d choose a large aperture (small number) to ensure a shallow depth of field. Macro photographers tend to be big users of large apertures to ensure that the element of their subject that they are focusing in on totally captures the attention of the viewer of their images while the rest of the image is completely thrown out of focus. Aperture on LensesEvery lens has a limit on how large or how small the aperture can get. If you take a look at the specifications of your lens, it should say what the maximum (lowest f-number) and minimum apertures (highest f-number) of your lens are. The maximum aperture of the lens is much more important than the minimum, because it shows the speed of the lens. A lens that has an aperture of f/1.2 or f/1.4 as the maximum aperture is considered to be a fast lens, because it can pass through more light than, for example, a lens with a maximum aperture of f/4.0. That’s why lenses with large apertures are better suited for low light photography. All lens apertures can be narrowed as much as you want. For example, every lens on the market today – regardless of manufacturer – can be set to f/16. However, the reverse is not true: every lens on the market cannot be opened up to f/1.4. The limit to how wide the lens can open is called the maximum aperture. A lens with a wider maximum aperture lets in more light. The minimum aperture is not that important, because almost all modern lenses can provide at least f/16 as the minimum aperture, which is typically more than enough for everyday photography needs. *Note that most lenses are at their sharpest around f/5.6 or f/8. However, many photographers are willing to trade some sharpness for the subject-isolating effects of a wider aperture. There are two types of lenses: “fixed” (also known as “prime”) and “zoom”. While zoom lenses give you the flexibility to zoom in and out (most point and shoot cameras have zoom lenses) without having to move closer or away from the subject, fixed or prime lenses only have one focal length. Due to the complexity of optical design for zoom lenses, many of the consumer lenses have variable apertures. What it means, is that when you are fully zoomed out, the aperture is one number, while zooming in will increase the f-number to a higher number. For example, the Nikon 18-200mm lens has a variable maximum aperture of f/3.5-f/5.6. When zoomed fully out at 18mm, the lens has an aperture of f/3.5, while when fully zoomed in at 200mm, the lens has an aperture of f/5.6. The heavy, professional zoom lenses, on the other hand, typically have fixed apertures. For example, the Nikon 70-200mm f/2.8 lens has the same maximum aperture of f/2.8 at all focal lengths between 70mm and 200mm. Why is this important? Because larger maximum aperture means that the lens can pass through more light, and hence, your camera can capture images faster in low-light situations. Having a larger maximum aperture also means better ability to isolate subjects from the background. Next will be ISO
0 Comments
What is Shutter Speed?Shutter speed is the amount of time that the lens stays open while taking a photo. Shutter speed is measured in seconds or fractions of seconds (1" is 1 second, 1/250 is 1 250th of a second). Most of the time, 1/60 or higher is used, anything under that and the camera should be placed on a tripod or image stabilizer should be used. The shutter speeds available depend on your camera. Some go up to 1/4000 sec., and some go higher or lower. There is also the option for slower shutter speeds (1/60 or lower), and the BULB setting is simple: however long you press down the shutter button is how long the sensor stays open, which is useful if you want to use a longer shutter speed than what is available. I strongly recommend using a shutter remote or release cable when using slower shutter speeds, especially for the BULB setting as it will eliminate the risk of camera shake when pressing the shutter release button. Choosing a Shutter SpeedWhat shutter speed to use completely depends on the subject and what you wish to achieve. Still objects don't need as fast of a shutter speed as a person running. Or stationary objects, 1/250 of a second or anything around that is a good choice, though if you are using a tripod you can go as low as you want. Moving subjects you'll want 1/250 seconds of faster to freeze the motion. I prefer using 1/500 of a second or higher and for really fast subjects (like wildlife or cars), I like anything higher than 1/1000 of a second. However, if you wish to caption motion blue (show the movement), use a slower shutter speed. Anything slower than 1/60 of a second will capture the motion of a moving subjects. Remember to use a tripod when using slower shutter speeds. Slow shutter speeds are great for long exposure shots for things such as waterfalls, stars, fireworks, etc., as it creates a sense of motion. You can get pretty creative with shutter speeds. Setting the Shutter SpeedWhen in Auto mode, the camera sets the elements for you (aperture, shutter speed and ISO). Semi-automatic modes set one part for you. When in Aperture Priority mode, you control the aperture but the camera will choose a shutter speed for you. In Shutter Priority mode, you choose the shutter speed and the camera does the rest. In Manual mode, you control all three (see Part 1 post). To find what your shutter speed is set to, look through the view finder and it should be on the bottom left corner or look at the screen section on your camera (on the back of some cameras, but some have it on top by the shutter release button), where your information is found. You should see a fraction and then f/__ (#). The numbers before the f/__ (aperture) is the shutter speed. An easy way to find your shutter speed is to set the camera to aperture priority mode and point your camera at a dark subject. Remember the numbers you see and then point it at a bright subject and which number changes is your shutter speed. FiltersThis is just a quick write up on filters, which will help with shutter speed in certain situations.
Neutral-Density (ND) Filters: These dark grey filters block the amount of light entering the lens and are available in a range of different strengths, each enabling the use of progressively slower shutter speeds. -ND filters are especially useful when out in bright light and wanting a slow shutter speed (i.e. for waterfalls). -If you don't have an ND filter, you can try using a very small aperture to get a slower shutter speed in bright light. Very strong ND Filters, combined with small apertures and low ISO sensitivities, enable the use of shutter speeds that stretch for minutes, even in the middle of a clear summer day. They’re routinely used to create minimalist long-exposure coastal pictures in which a rough sea resembles a polished ice rink. 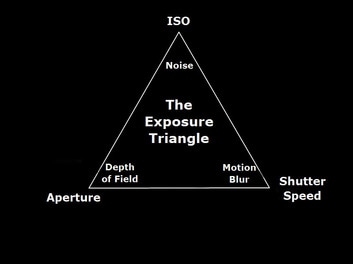 IntrudctionWhat is the Exposure Triangle? There are three elements that control what exposure you get while taking a picture; Shutter Speed, ISO and Aperture. When in Manual mode, you control all three elements. When in Shutter Priority Mode, you control the shutter and the camera does the rest and in Aperture Priority Mode you control aperture and the camera controls the rest. The only true manual mode is Manual Mode, all other modes are considered automatic, even shutter and aperture priority modes which are semi-automatic. Shutter Speed - the amount of time that the shutter is open ISO - the measure of a digital camera sensor's sensitivity to light Aperture - the size of the opening in the lens when a picture is taken It is at the intersection of these three elements that an image's exposure is made. Most importantly: changing one elements settings will create a ripple affect and in turn will effect the other two elements. You have to have all three elements in mind during manual mode, especially when changing a setting. Remember, each of these elements are aspects of light and how it enters and interacts with the camera. 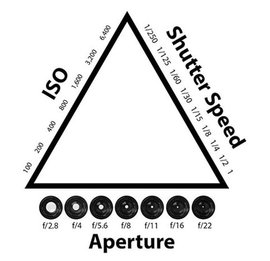 Bringing It TogetherMastering the art of exposure is something that takes a lot of practice. In many ways it's a juggling act and even the most experienced photographers experiment and tweak their settings as they go. Keep in mind that changing each element not only impacts the exposure of the image, but each one also has an impact upon other aspects of it (i.e: aperture changes depth of field, shutter speed impacts how motion is captured and ISO changes the graininess of the shot (noise)).
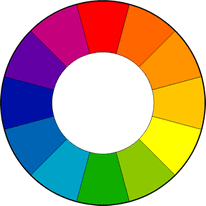
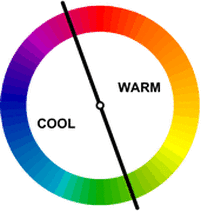
The great thing with digital cameras is that they are a great way to learn about exposure. Take as many shots as you wish at no cost but with the different modes you can learn at your own pace. Automatic modes make the decisions for you and semi-automatic modes allow you you to make the decision on one or two of the elements. The highest you can go is Manual mode where you choose all the settings. It's best to know your camera and each element of the exposure triangle prior to going full manual. Colour SchemesPhotography is made up of certain elements and guidelines. But an important thing in any photo, is of course colour. Below is a photo of the colour wheel, which I'll be using to explain things. The colour wheel dates back to 1666. Three primary colours, which are Blue, Red and Yellow. Every other colour out there are created by mixing these three colours together. Primary colours mixed together creates Secondary colours (Orange/Purple/Green) and when those are mixed together, they create Tertiary colours. Warm vs Cool: Warm colour tones range from red to yellow and create a sense of warmth or heat in an image. Cool colour tones are usually mostly blues and gives an impression of coldness.
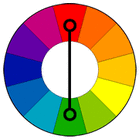
Complimentary Colours
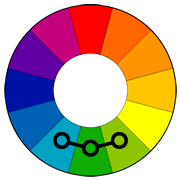
Analogous Colours
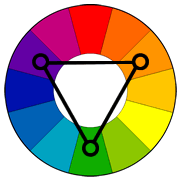
Triadic Colours
Monochromatic ColoursA monochromatic scene consists of varying shades of a single color. The key to a successful monochromatic image is to find scenes with good contrast throughout the image--you want the photo to have a dark version of the color, a light one and a good range of tones in between. ConlusionComplementary, Analogous and Triadic are the three main colour schemes. They are very useful in photography, but really in any art form. Colour influences the mood of an image and can make objects or points of interest stand out. However, be careful. When used incorrectly, they can ruin an image.
|
AuthorPhotographer & animal lover with a barn full of rabbits and a cat. Archives
January 2021
Categories |
 RSS Feed
