Minimalism |
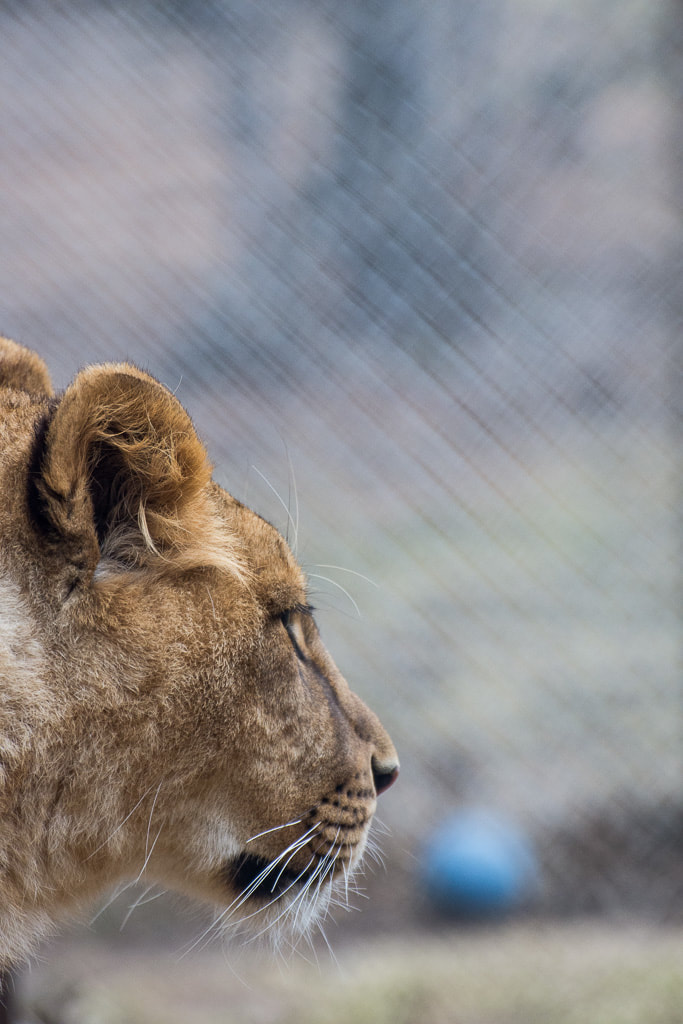  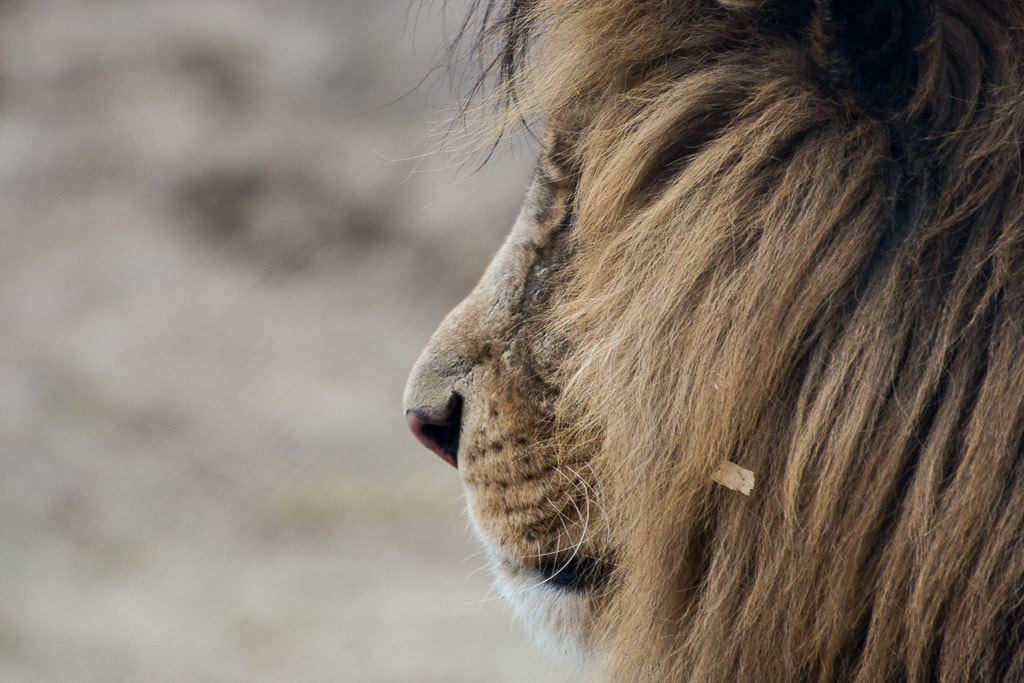 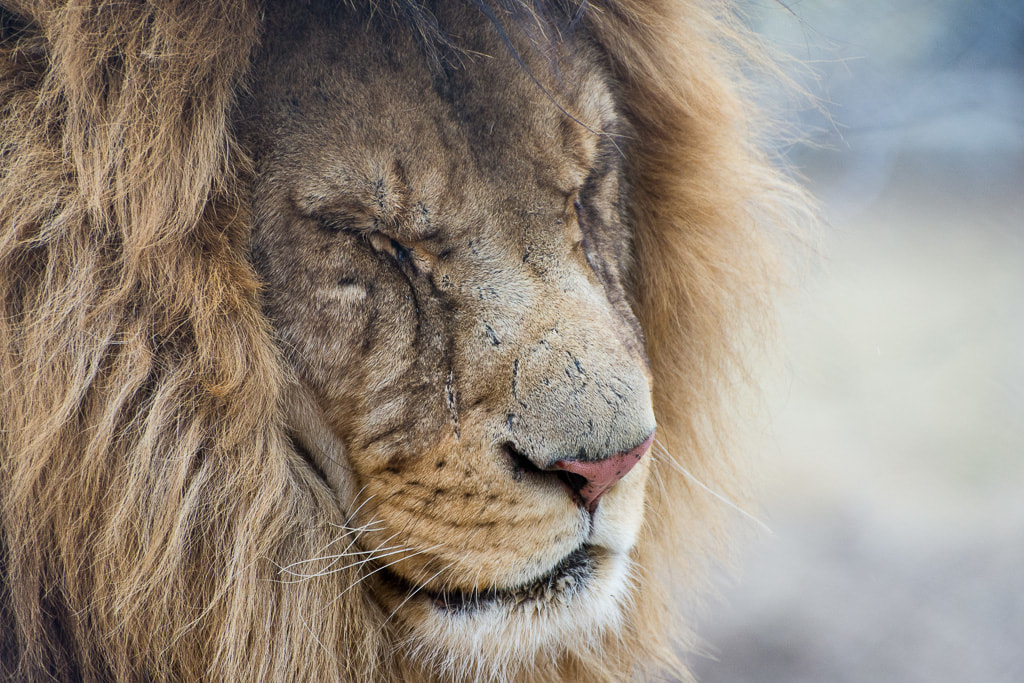 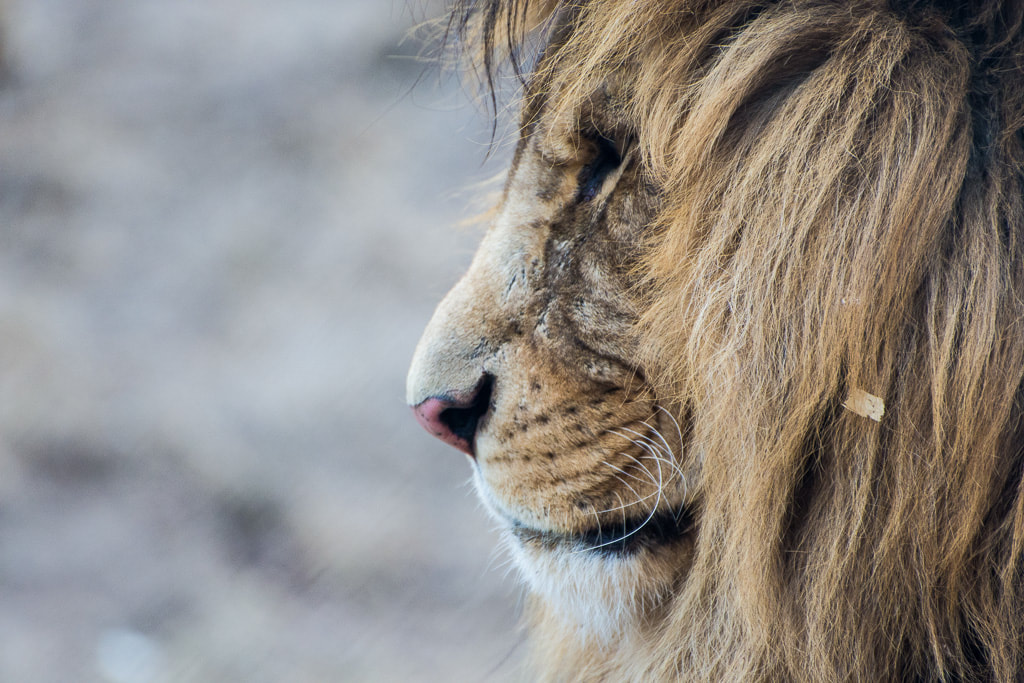 | 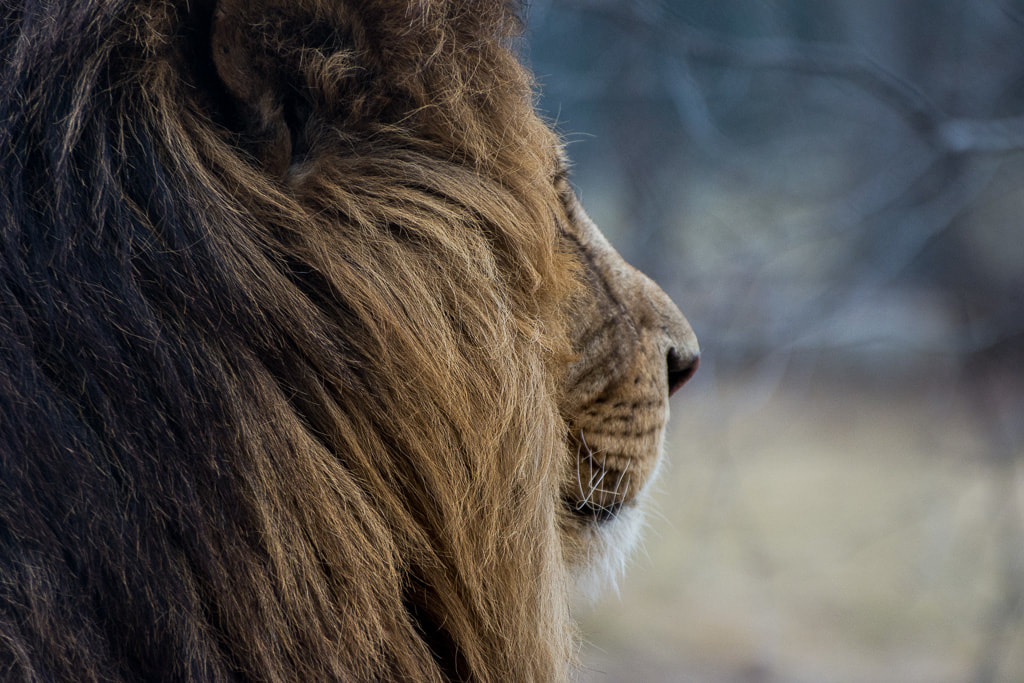 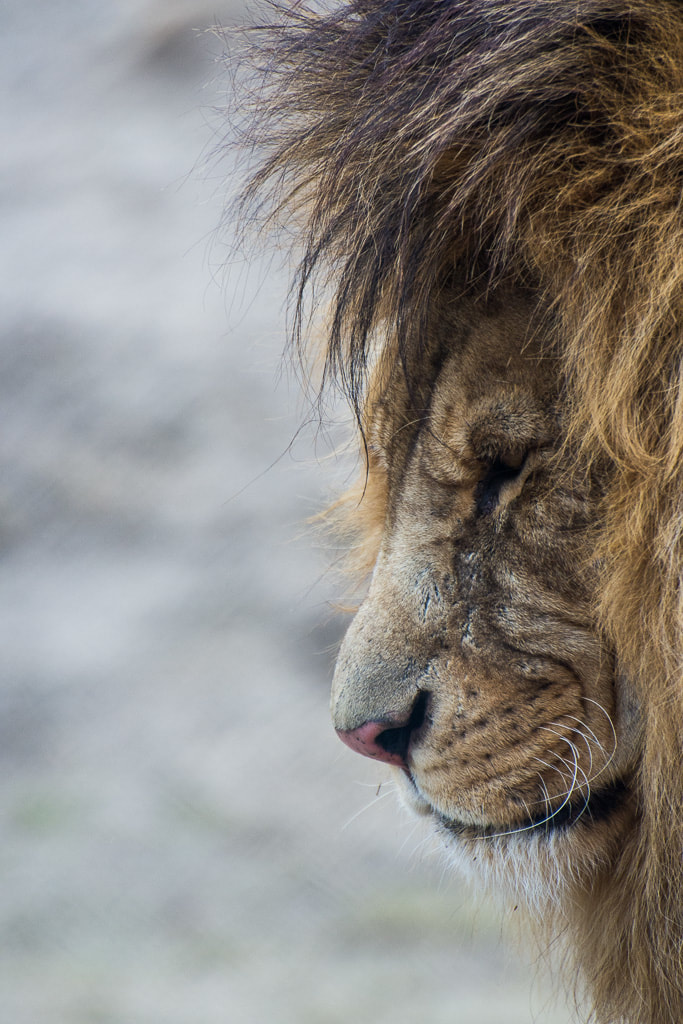 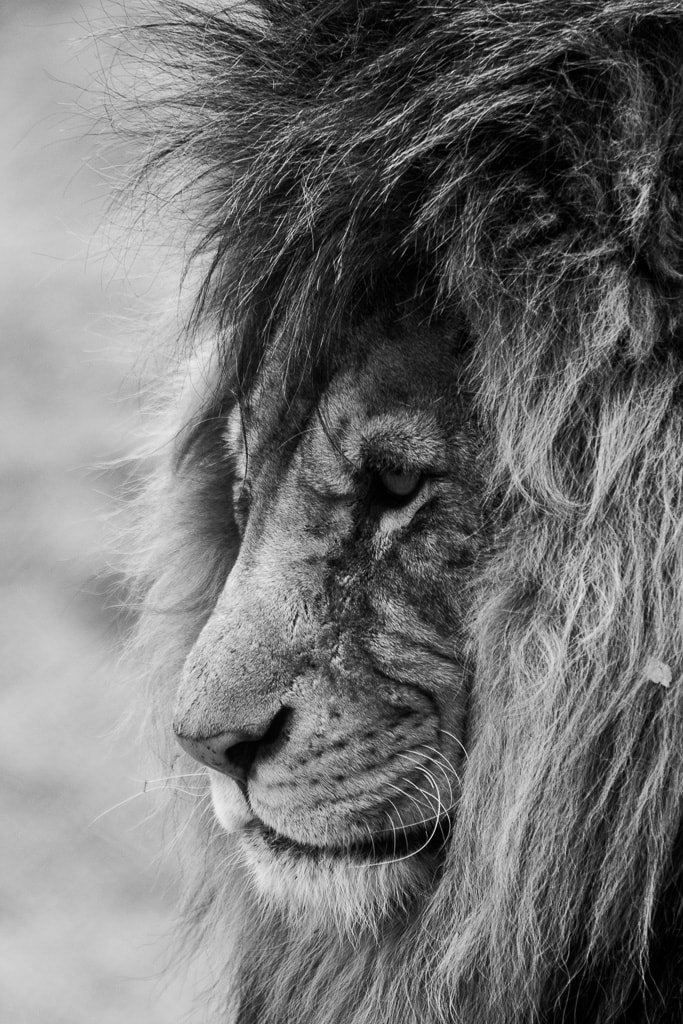 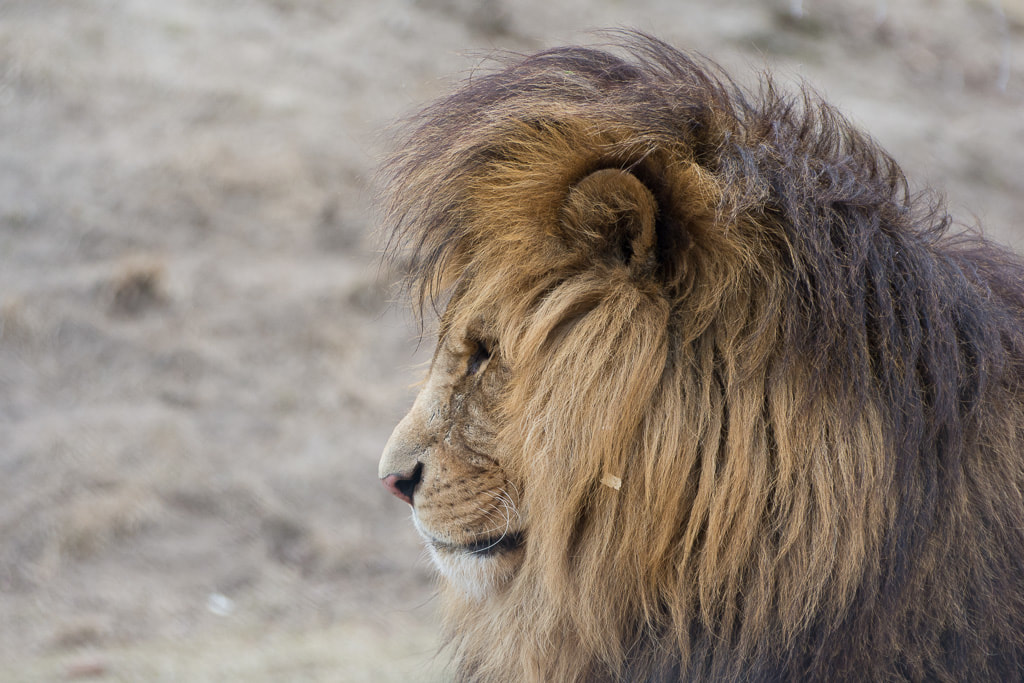 |
The above images were taken on March 4, 2018. They were photographed at the Oaklawn Farm Zoo. I've known the owners my entire life, very good friends with my grandparents and great grandparents. My grandfather went with us this time, and, being the off season so the zoo was closed, we were able to go up close and personal with the animals and out back in the barns and enclosures past the safety fences (while staying outside of the immediate fencing though). It was an incredible experience and I loved being able to get the closer images. The female lion was a camera hog; every time I was photographing the male lion, she would jump up and paw at my camera until I photographed her again. I'll post more images in a separate blog entry soon! You really just want to stick your hand in and pet them.
Above are some older images
5 Comments
Wide Angle
Week Nine
This is a blog circle!
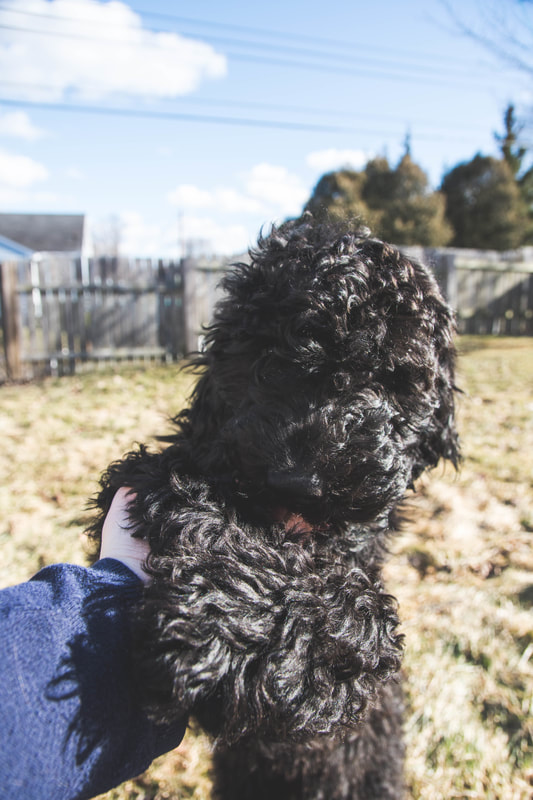
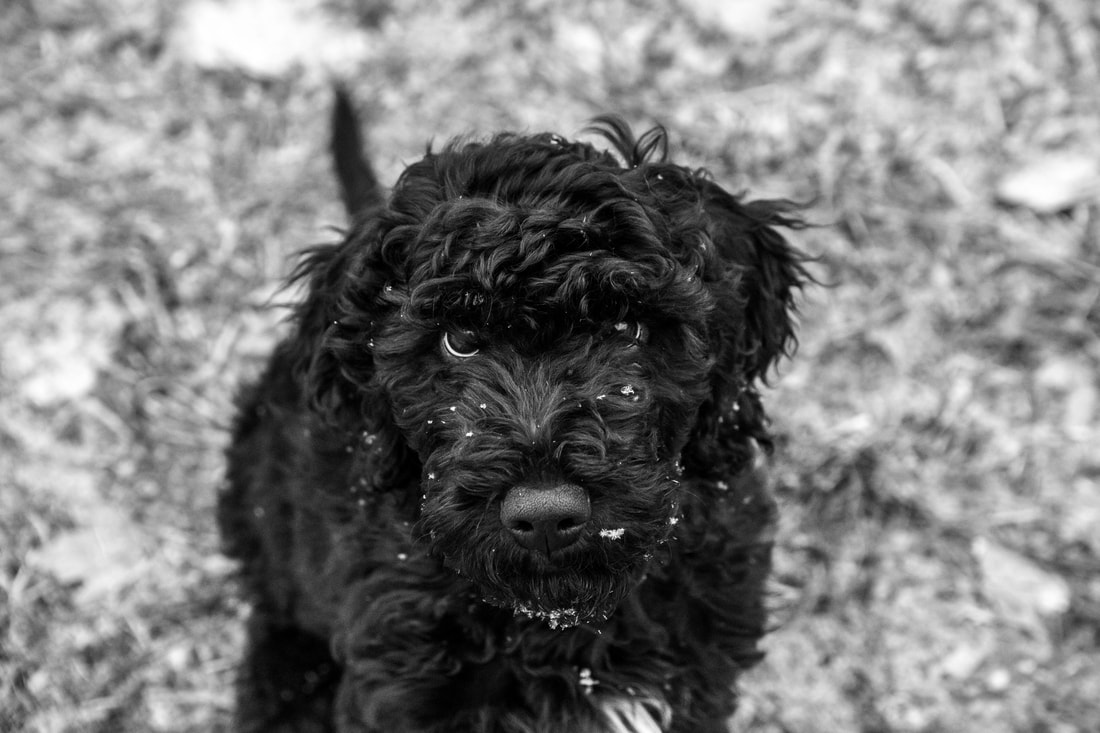
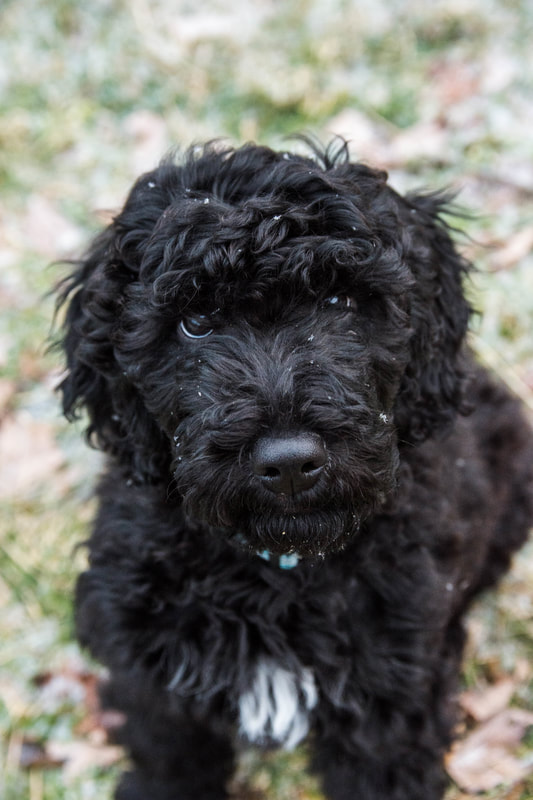
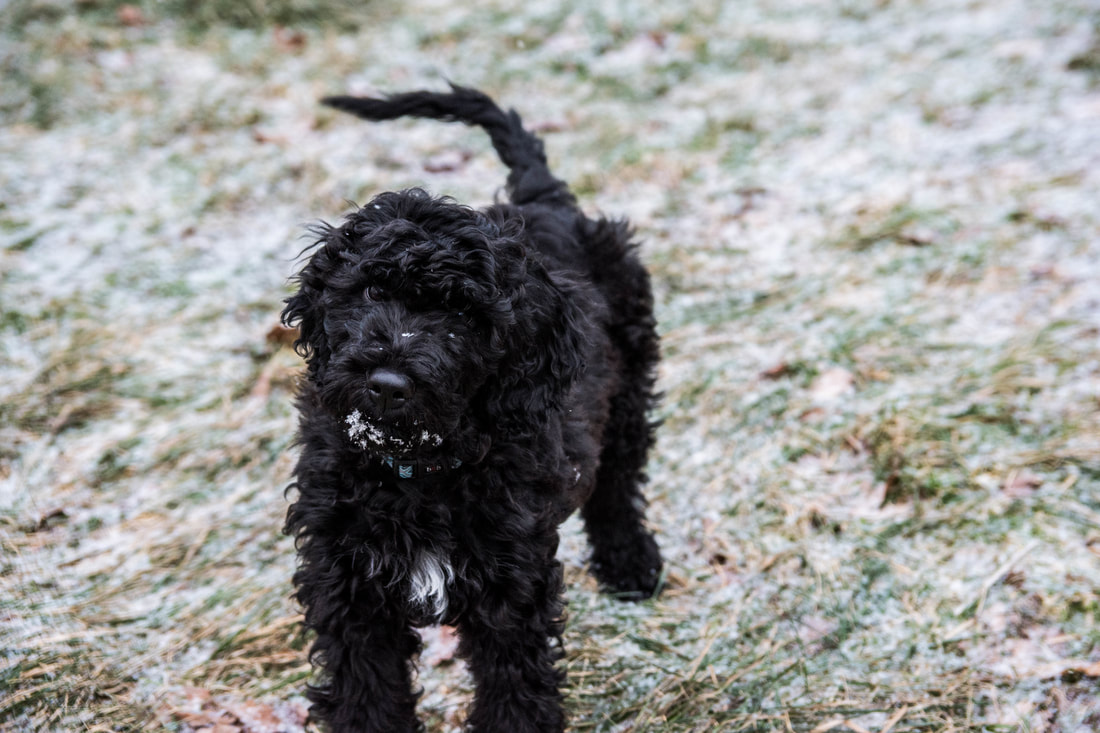
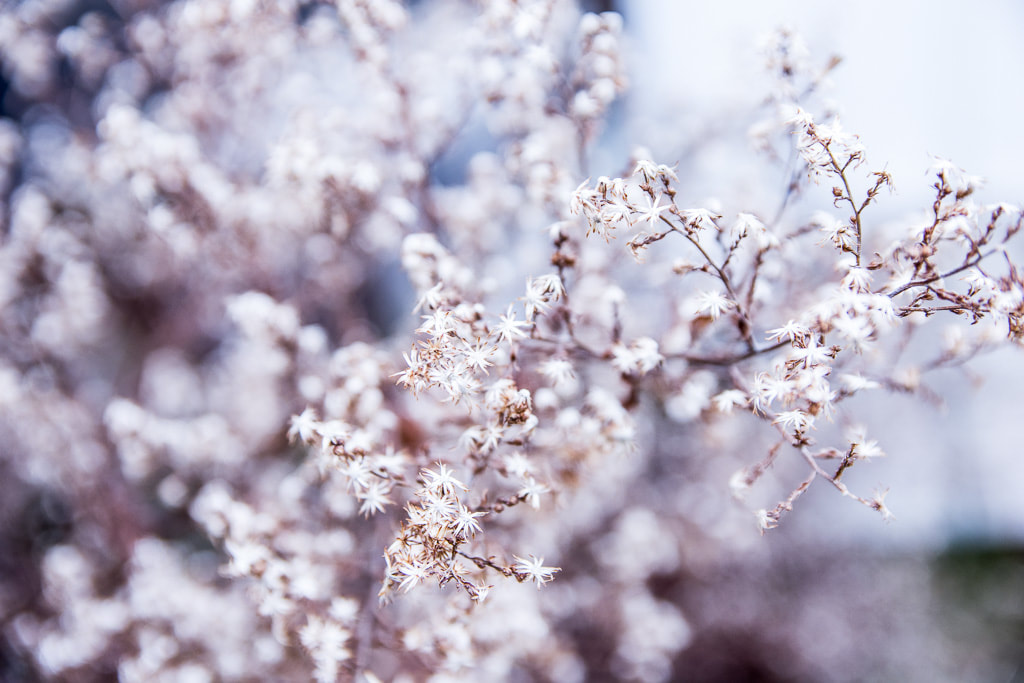
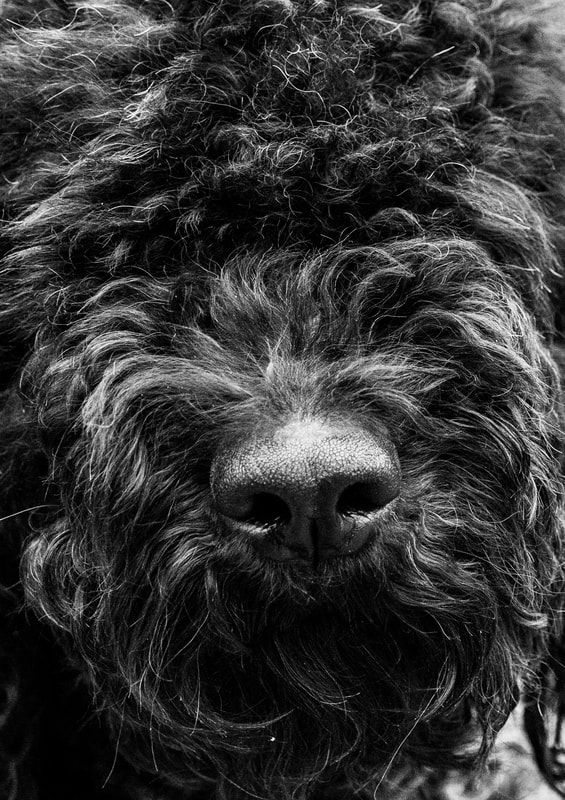
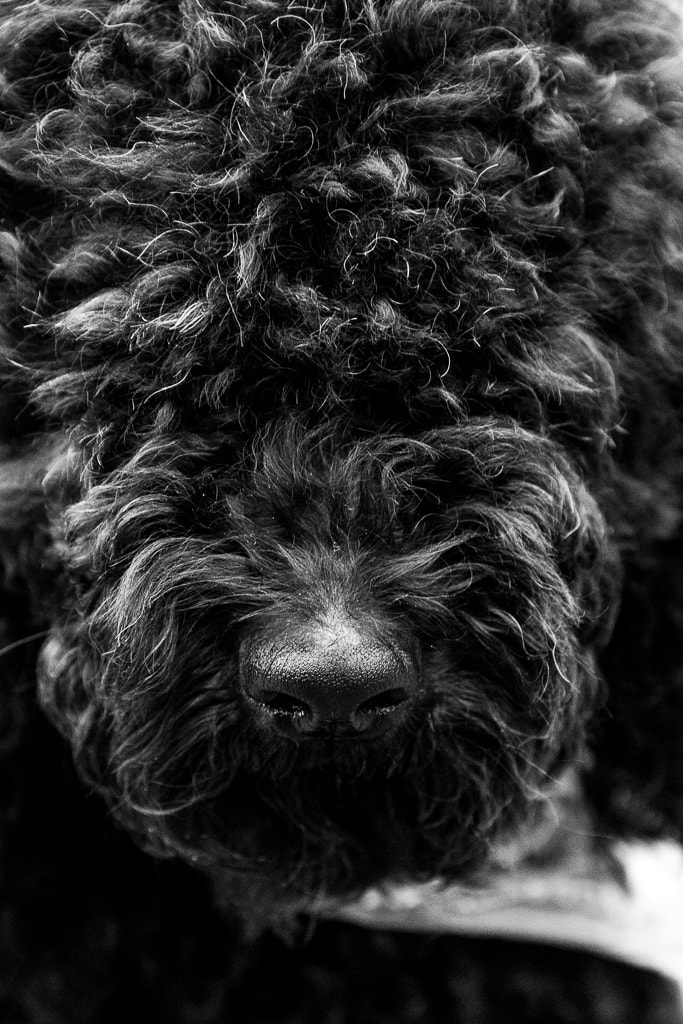
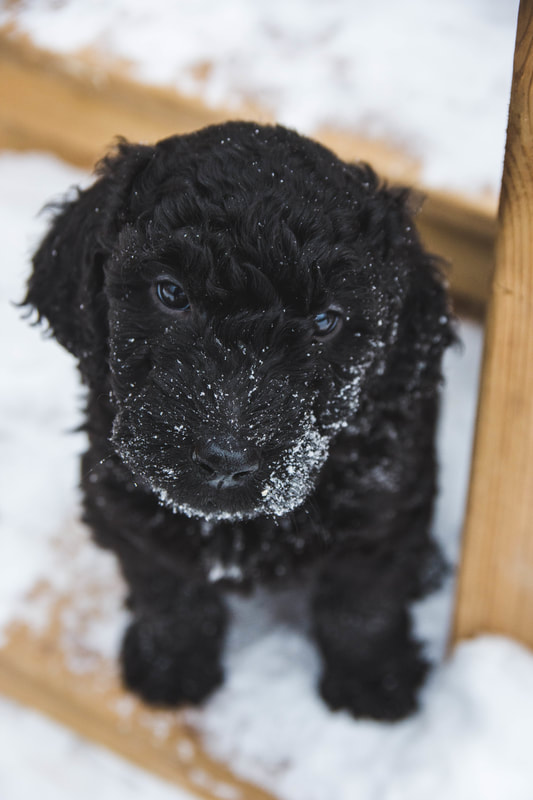
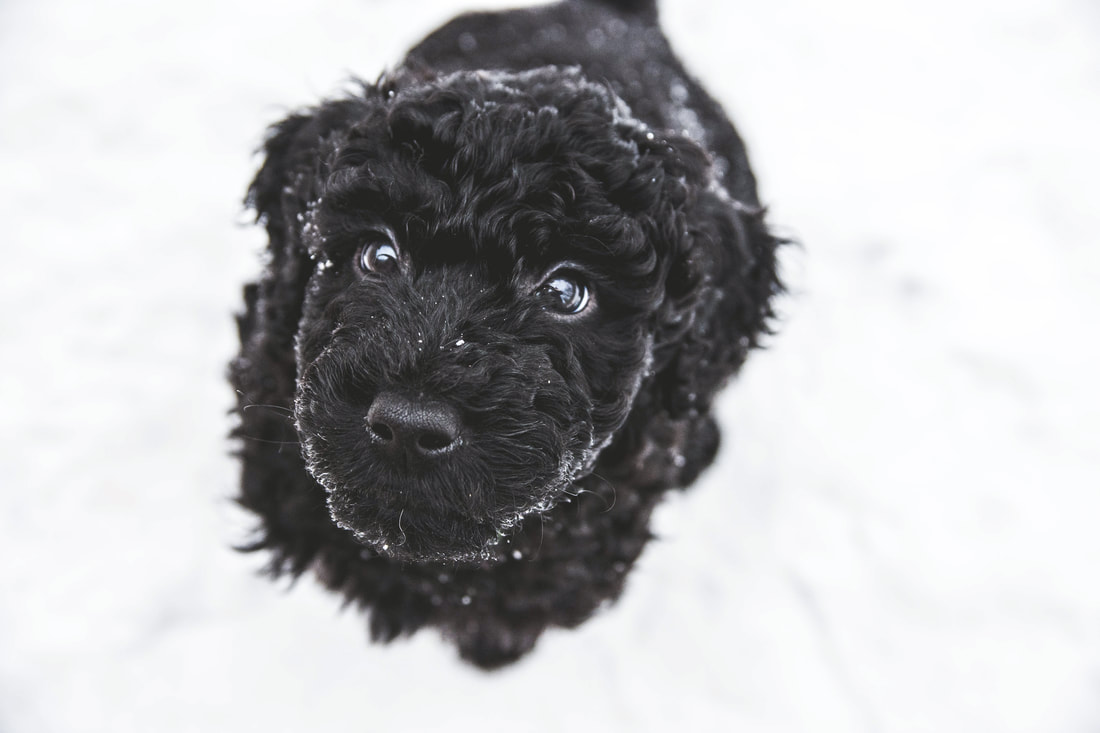
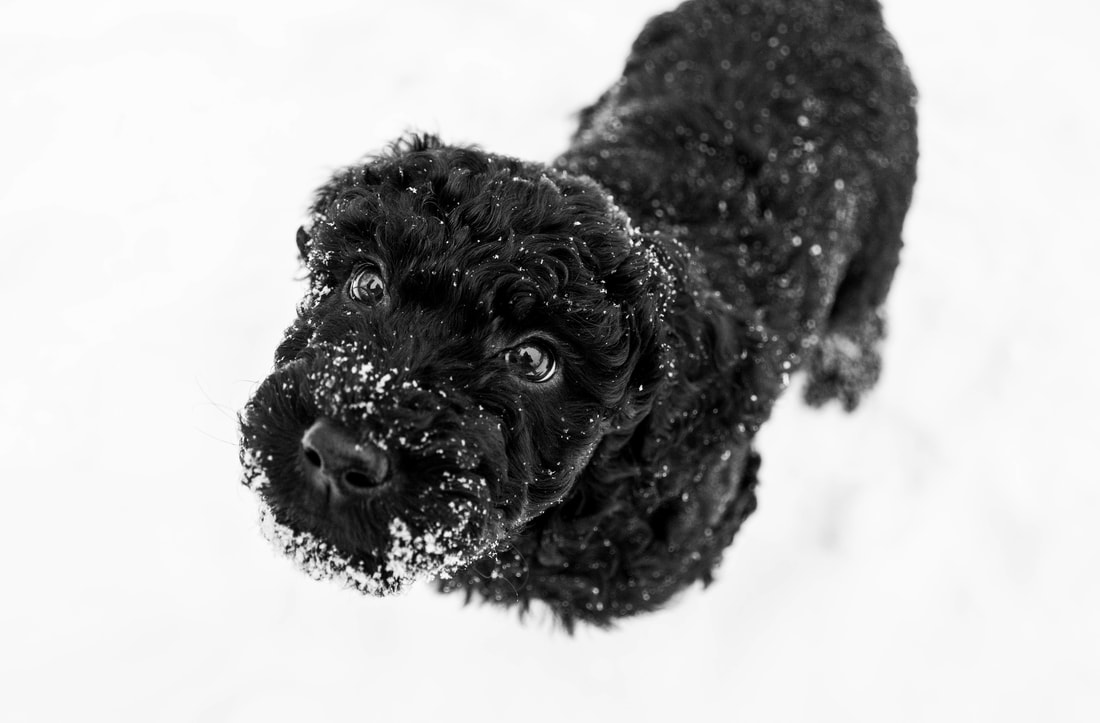
Wide Angle Lens: Wide angle lenses are usually under 35mm focal length. They have shorter focal lengths, and allow for a wider field of view. Wide angle lenses are most commonly used in landscape photography but are not limited to landscapes. I own a 17-50mm wide angle zoom lens that I use quite often, even for my pet photography. The first three images of the Barbet puppy were all used with that lens, at around the widest angle.
Distortion: Because wide angle lenses take in such a wide field of view, they can distort the physical appearance of objects. Objects closer to the camera will look larger than those farther away. Common notices are lines that will be curved instead of straight, or noses and faces on humans and animals will be larger than normal.This distortion can make for interesting images if you play around with it.
Play around with wide angles and have fun. I added some older images that show wide angles as well. I love shooting landscapes at wide angles to capture the most that I can.
This weeks blog circle link is Ursula M. Garrison Photography, serving Northern Wisconsin and the Chequamegon Bay Area. Follow the link to see other photographers blogs and images for this weeks theme.
 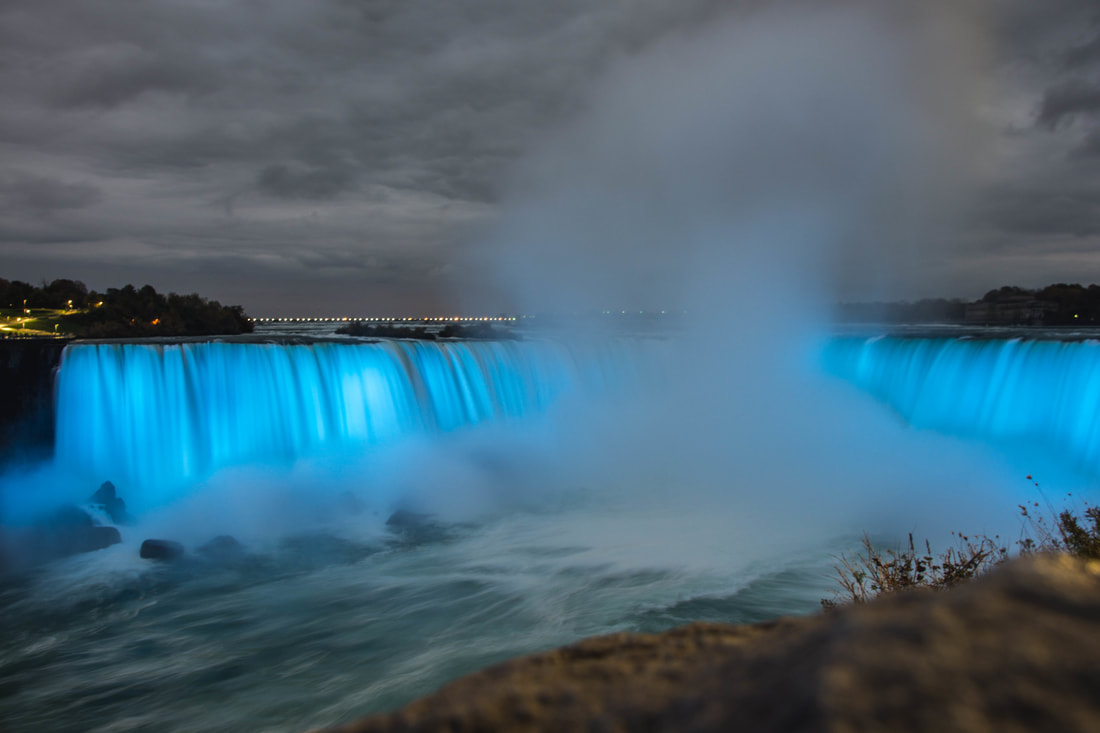 Niagara Falls, ON 2017 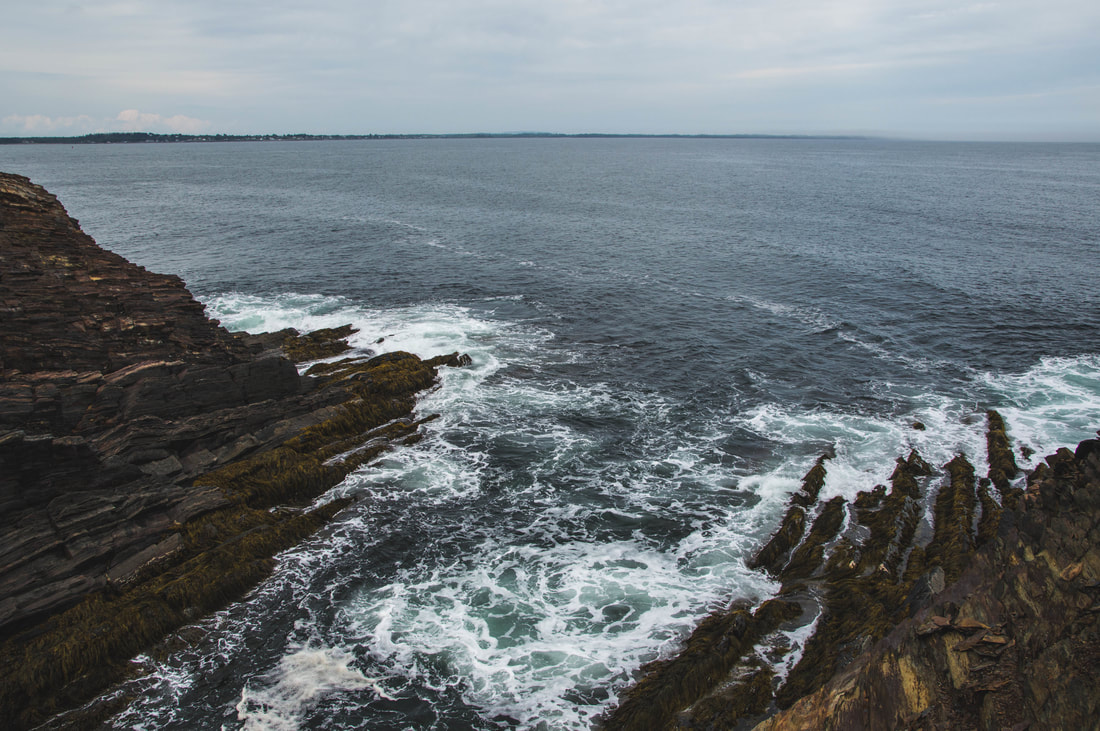 The Ovens, NS 2015 |  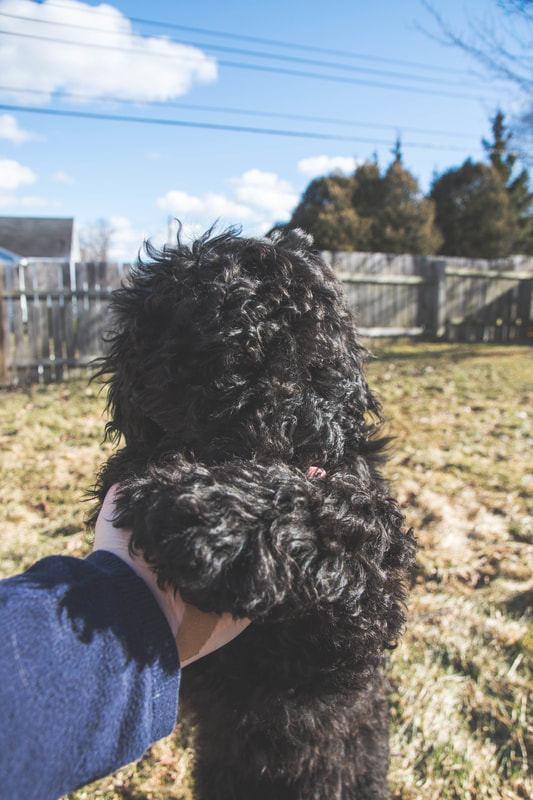 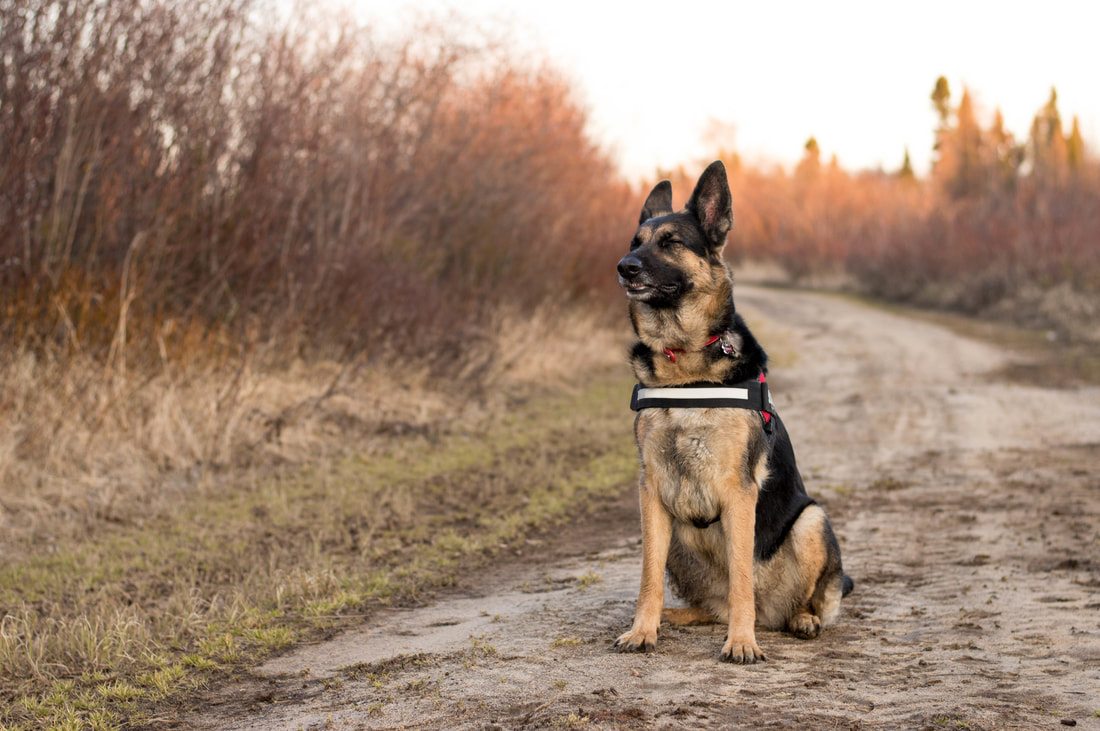 Chisasibi, QU 2015 |
Year of the Dog
Week Seven
This is a blog circle!
2018 is the Year of the Dog in the Chinese New Year. So this weeks theme is focused more on Canine Photography. The dog is the eleventh Zodiac animal.
'Honest and Loyal, dogs are the truest friends and most reliable partner'. Dogs are loyal and smart, and the bonds will last a lifetime. They truly are mans best friend.
Personally, dogs are one of my favourite animals. They have always and will always be a big part of my life.
Photographing Dogs
While learning photography, my dog was my biggest subject. She helped me become the photographer I am today. Dogs are a joy to photograph.
When I photograph dogs, I like to get down to their level. I try to bring out emotion and personality in the images I create. I like to show the emotion in their eyes. Being eye level is best, but it's always fun to experiment with different levels, angles and perspectives.
Bringing out the dogs personality is important when photographing them. Remember the standard photography rules such as Rule of Thirds and composition.
Portraits: I like to have the dogs play a bit before hand to tired them a bit, especially puppies. I take my time, especially with new dogs and those that have never been photographed before. Let them get use to the equipment as well as get use to you. Use treats and toys to keep their attention. Use a shallow depth of field to blur out the background.
Action: Action is especially important as being at eye level, shooting straight on. Make sure you use a fast shutter speed to capture the motion.
Puppies can be difficult to photograph. They don't like to sit still for long periods, so fast shutter speeds are helpful, and quick shooting. Tire them out prior to shooting. I do personally prefer the dog know a sit command.
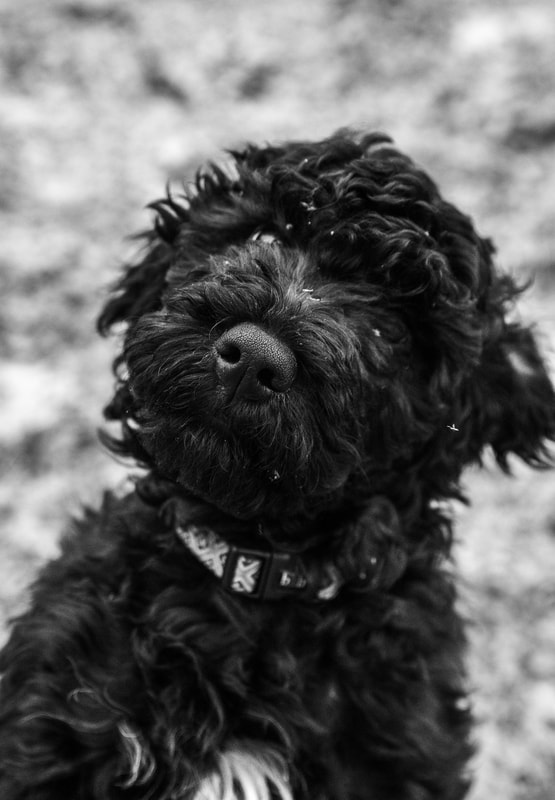
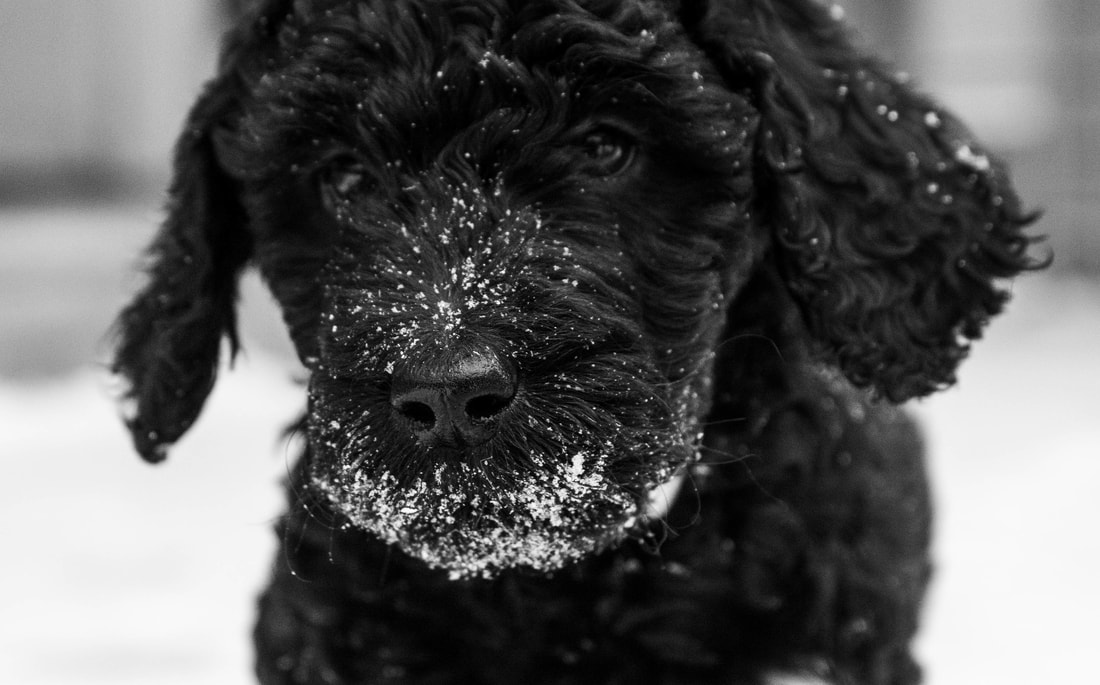
Below are some examples are dog images taken this past week. They are of my 13 week old Barbet puppy, who doesn't like to sit still and is too curious of the camera. We're working on being able to shoot at eye level. Check out my Domestic Pet portfolio for more canine photography examples.
Remember, this is a blog circle so head on over to Linda Perdue of VPShoots Photography serving Tampa Bay Area for more blogs and image examples.
Information on Year of the Dog https://chinesenewyear2018.com/zodiac/dog/
Remember, this is a blog circle so head on over to Linda Perdue of VPShoots Photography serving Tampa Bay Area for more blogs and image examples.
Information on Year of the Dog https://chinesenewyear2018.com/zodiac/dog/
   |   |
Depth of Field
Week Five
This is a blog circle!
Depth of Field; an important part of composition. Depth of Field (DoF) helps to blur the background or keep it in focus. Below is part of my blog on Aperture, which affects depth of field.
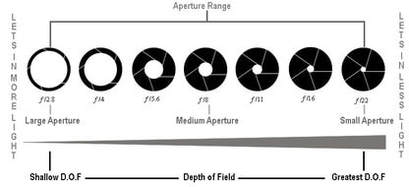
'Depth of field is a by-product of aperture. The size of aperture has a direct impact on depth of field.
There are a number of results of changing the aperture of your shots that you’ll want to keep in mind as you consider your setting but the most noticeable one will be the depth of field that your shot will have.
Depth of Field (DOF) is that amount of your shot that will be in focus. Large depth of field means that most of your image will be in focus whether it’s close to your camera or far away. For example the landscape shot above has an aperture of f/16 and the result is that both the mountain in the background and the boats in the foreground remain in focus.
Small (or shallow) depth of field means that only part of the image will be in focus and the rest will be fuzzy.
Aperture has a big impact upon depth of field. Large aperture (remember it’s a smaller number) will decrease depth of field while small aperture (larger numbers) will give you larger depth of field.
It can be a little confusing at first but the way I remember it is that small numbers mean small DOF and large numbers mean large DOF.'
Depth of Field; an important part of composition. Depth of Field (DoF) helps to blur the background or keep it in focus. Below is part of my blog on Aperture, which affects depth of field.
'Depth of field is a by-product of aperture. The size of aperture has a direct impact on depth of field.
There are a number of results of changing the aperture of your shots that you’ll want to keep in mind as you consider your setting but the most noticeable one will be the depth of field that your shot will have.
Depth of Field (DOF) is that amount of your shot that will be in focus. Large depth of field means that most of your image will be in focus whether it’s close to your camera or far away. For example the landscape shot above has an aperture of f/16 and the result is that both the mountain in the background and the boats in the foreground remain in focus.
Small (or shallow) depth of field means that only part of the image will be in focus and the rest will be fuzzy.
Aperture has a big impact upon depth of field. Large aperture (remember it’s a smaller number) will decrease depth of field while small aperture (larger numbers) will give you larger depth of field.
It can be a little confusing at first but the way I remember it is that small numbers mean small DOF and large numbers mean large DOF.'
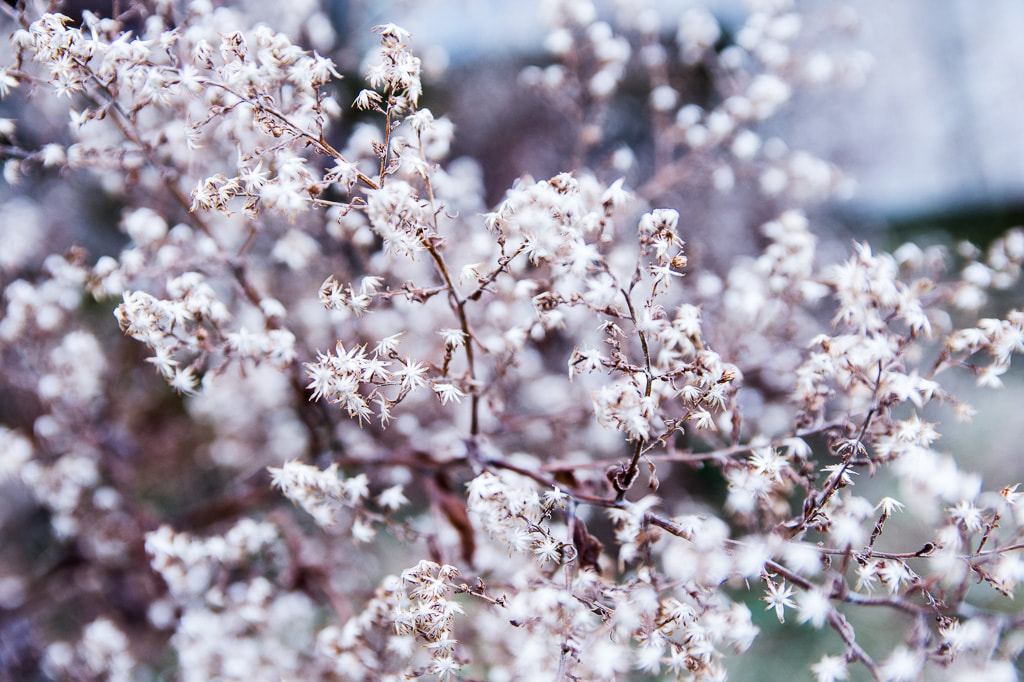
'Most landscape photography you’ll see small aperture settings (large numbers) selected by photographers. This ensures that from the foreground to the horizon is relatively in focus.
On the other hand in portrait photography it can be very handy to have your subject perfectly in focus but to have a nice blurry background in order to ensure that your subject is the main focal point and that other elements in the shot are not distracting. In this case you’d choose a large aperture (small number) to ensure a shallow depth of field.
Macro photographers tend to be big users of large apertures to ensure that the element of their subject that they are focusing in on totally captures the attention of the viewer of their images while the rest of the image is completely thrown out of focus.'
For the full blog on Aperture, click on the link or scroll down.
 f/3.2 | 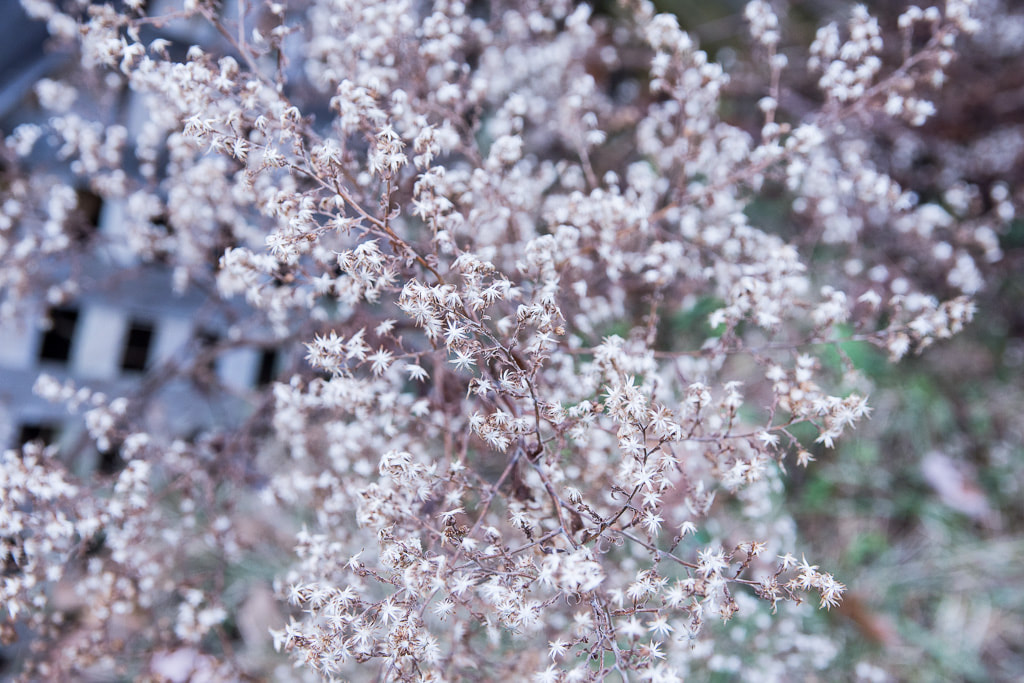 f/4.5 | 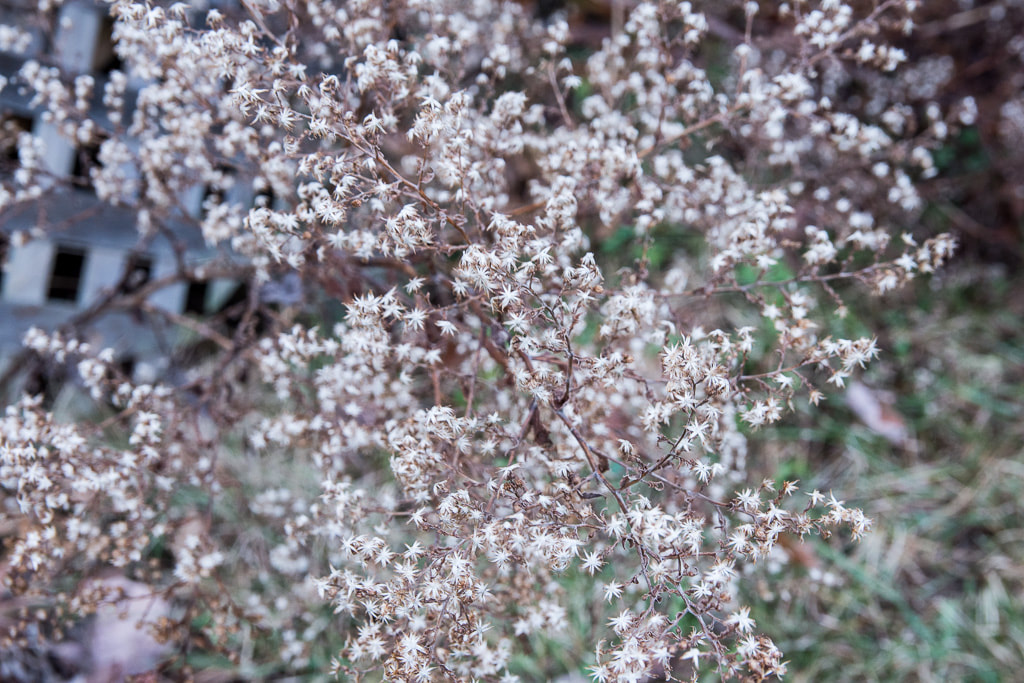 f/6.3 |
The above three images shows how depth of field can change an image. Having a large depth of field can create a busy and distracting background by bringing more in to focus.
 f/3.2 | 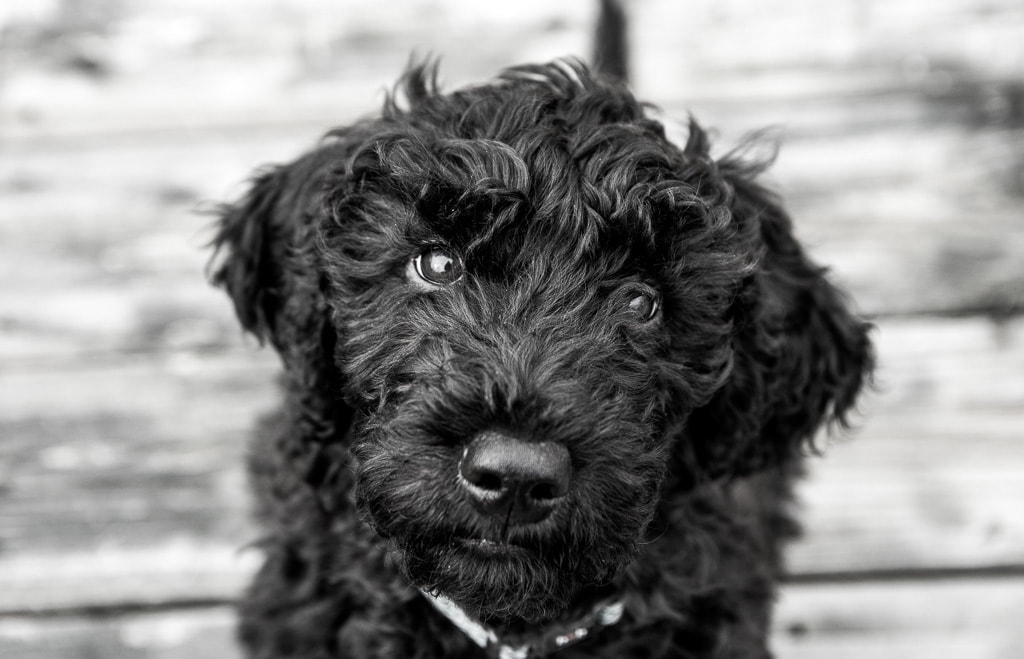 f/3.2 |
These images would lose their feeling and impact if the backgrounds were in focus; it would distract the viewer from the main subject of the image. This is why we use shallow depth of fields.
This blog is week five in the 52 week photo challenge I'm involved in. It's a blog circle, so be sure to head on over to Tim Evans of Tim Evans Photography, serving South Mississippi to check out more images and blogs on depth of field.
This blog is week five in the 52 week photo challenge I'm involved in. It's a blog circle, so be sure to head on over to Tim Evans of Tim Evans Photography, serving South Mississippi to check out more images and blogs on depth of field.
Fill The Frame
Week Three
| This is a blog circle! Composition: One of the most important things in my opinion to photography. Filling the frame with your subject can help tell the story you want to portray to the viewer. By filling the frame, you eliminate unneeded space in the image. When the unneeded space is eliminated from the image, it creates a less busy image, focused solely on the subjects and avoids distracting backgrounds. It also helps to bring out the details in a shot, because the more subject in the image, the more detail is seen. Filling the frame doesn't mean there can't be any space around the subject, as seen in the image of Smudge, a Havanese. She still fills the entire frame, leaving little empty space in the composition. | 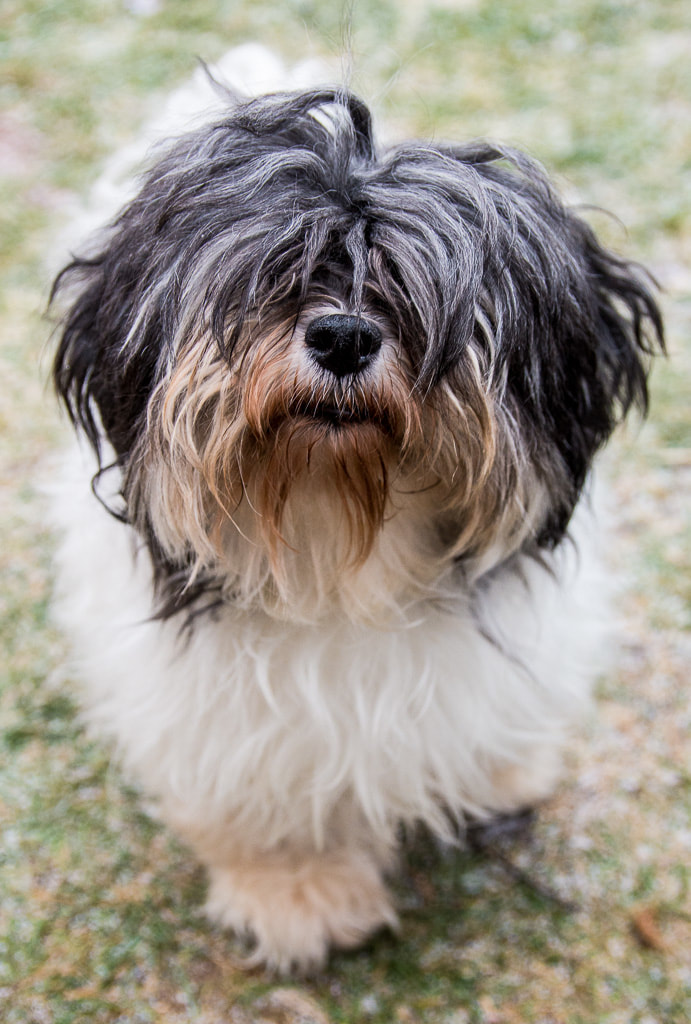 CKC & CFC Ch. LosSombra's Little Cover Girl CGN *Smudge* |
Cropping can be a good way to fill the frame if unable to do so in camera while shooting, but trying to get the composition as close as you want it in camera is best. While filling the frame with the subject, it's good to remember the Rule of Thirds for arranging the composition.
This technique can be used for any subject from landscape, people, kids, pets, still life; any subject you can think of.
This technique can be used for any subject from landscape, people, kids, pets, still life; any subject you can think of.
 |  |
Above are images of CFC Ch. Filipe's Freyja at LosSombra. She is a Barbet (French Water Dog) and the dam of the pups I posted in the previous blog; Rule of Thirds. She does in fact have eyes under the fur.
This weeks theme is part of the 52 Week Pet Photography Challenge that I am a part of. It is a blog circle style, so head on over to Nancy Kieffer Photography, serving central New York, Adirondacks and beyond to continue the circle and see more images and blogs on the theme; Filling the Frame.
This weeks theme is part of the 52 Week Pet Photography Challenge that I am a part of. It is a blog circle style, so head on over to Nancy Kieffer Photography, serving central New York, Adirondacks and beyond to continue the circle and see more images and blogs on the theme; Filling the Frame.
Happy New Year.
I have been pretty distant from photography the past year since our dog Bree passed away in March 2017. She was my inspiration and my best model. I learned most of my photography from practicing on her. I could spend hours a day out photographing her. Since she's been gone, I don't find myself wanting to pick up my cameras and photograph anything anymore. My desire and inspiration are gone.
My goal for 2018 is to start photographing again. I've joined not one, but three 52 week photography challenges. Each week for the next year is a theme, and you must go out and shoot images for said theme. I'm hoping I'll find my inspiration again.
Rule of Thirds
Week Two
This is a blog circle!
For one of the photo challenges I'm involved in, the theme is Rule of Thirds. These are seven week old Barbet puppies that I photographed. They are adorable and playful and loved the snow. https://digital-photography-school.com/rule-of-thirds/ is a great website for information of Rule of Thirds.
The idea for Rule of Thirds is to set your composition up for the subject is not in the centre of the image. Image the image is cut with two lines horizontally and two lines vertically across the image. The 'best' places place eyes and main features is on the four intersecting spots. Which would put things in the top or bottom third and vice versa for the sides. Horizon lines should not be placed directly in the centre, but around one of the lines.
Just like with most rules in photography, the Rule of Thirds is fun to break. However, before breaking the rule, make sure to understand it and be capable of using the Rule of Thirds. But once you're comfortable using it, try breaking it. Be bold and put your subject in the centre.
And remember, it doesn't have to be done completely in camera, you can crop the image after wards though try to get the image done in camera as best as you can.
Update 08-08-2018: A blog I used as reference for Rule of Thirds recently updated their blog. It's a great blog that explains the Rule of Thirds, if you want to check it out, click here.
   |      |
This particular 52 week challenge is a blog circle style. Head on over to Lynda Mowat, photographing pets and their families, based in Hamilton New Zealand to continue the circle and see more images taken for the challenge.
Aperture
If you can master aperture you put into your grasp real creative control over your camera. In my opinion – aperture is where a lot of the magic happens in photography and changes in it can mean the difference between one dimensional and multi-dimensional shots.
What is Aperture?
Put most simply – Aperture is ‘the opening in the lens.’
The iris of the lens that controls the size (diameter) of the aperture is called “diaphragm” in optics. The sole purpose of the diaphragm is to block or stop all light, with the exception of the light that goes through the aperture.
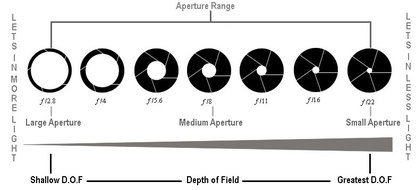
When you hit the shutter release button of your camera a hole opens up that allows your cameras image sensor to catch a glimpse of the scene you’re wanting to capture. The aperture that you set impacts the size of that hole. The larger the hole the more light that gets in – the smaller the hole the less light.
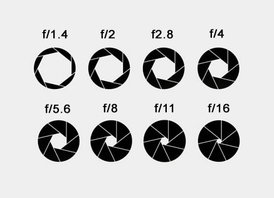
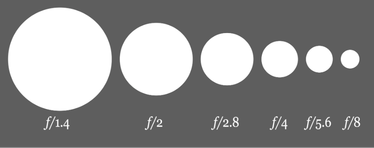
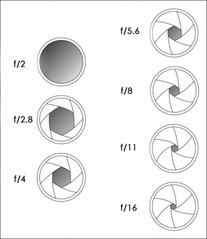
Aperture is measured in ‘f-stops’.
You’ll often see them referred to as f/number – for example f/2.8, f/4, f/5.6,f/8,f/22 etc. Moving from one f-stop to the next doubles or halves the size of the amount of opening in your lens (and the amount of light getting through). Keep in mind that a change in shutter speed from one stop to the next doubles or halves the amount of light that gets in also – this means if you increase one and decrease the other you let the same amount of light in – very handy to keep in mind).
One thing that causes a lot of new photographer’s confusion is that large apertures (where lots of light gets through) are given f/stop smaller numbers and smaller apertures (where less light gets through) have larger f-stop numbers. So f/2.8 is in fact a much larger aperture than f/22. It seems the wrong way around when you first hear it but you’ll get the hang of it.
Smaller number = bigger aperture = more light & bigger number = smaller aperture = less light
The iris of the lens that controls the size (diameter) of the aperture is called “diaphragm” in optics. The sole purpose of the diaphragm is to block or stop all light, with the exception of the light that goes through the aperture.
When you hit the shutter release button of your camera a hole opens up that allows your cameras image sensor to catch a glimpse of the scene you’re wanting to capture. The aperture that you set impacts the size of that hole. The larger the hole the more light that gets in – the smaller the hole the less light.
Aperture is measured in ‘f-stops’.
You’ll often see them referred to as f/number – for example f/2.8, f/4, f/5.6,f/8,f/22 etc. Moving from one f-stop to the next doubles or halves the size of the amount of opening in your lens (and the amount of light getting through). Keep in mind that a change in shutter speed from one stop to the next doubles or halves the amount of light that gets in also – this means if you increase one and decrease the other you let the same amount of light in – very handy to keep in mind).
One thing that causes a lot of new photographer’s confusion is that large apertures (where lots of light gets through) are given f/stop smaller numbers and smaller apertures (where less light gets through) have larger f-stop numbers. So f/2.8 is in fact a much larger aperture than f/22. It seems the wrong way around when you first hear it but you’ll get the hang of it.
Smaller number = bigger aperture = more light & bigger number = smaller aperture = less light
Depth of Field & Aperture
Depth of field is a by-product of aperture. The size of aperture has a direct impact on depth of field.
There are a number of results of changing the aperture of your shots that you’ll want to keep in mind as you consider your setting but the most noticeable one will be the depth of field that your shot will have.
Depth of Field (DOF) is that amount of your shot that will be in focus. Large depth of field means that most of your image will be in focus whether it’s close to your camera or far away. For example the landscape shot above has an aperture of f/16 and the result is that both the mountain in the background and the boats in the foreground remain in focus.
Small (or shallow) depth of field means that only part of the image will be in focus and the rest will be fuzzy.
Aperture has a big impact upon depth of field. Large aperture (remember it’s a smaller number) will decrease depth of field while small aperture (larger numbers) will give you larger depth of field.
It can be a little confusing at first but the way I remember it is that small numbers mean small DOF and large numbers mean large DOF.
Different Styles use Different Apertures
Most landscape photography you’ll see small aperture settings (large numbers) selected by photographers. This ensures that from the foreground to the horizon is relatively in focus.
On the other hand in portrait photography it can be very handy to have your subject perfectly in focus but to have a nice blurry background in order to ensure that your subject is the main focal point and that other elements in the shot are not distracting. In this case you’d choose a large aperture (small number) to ensure a shallow depth of field.
Macro photographers tend to be big users of large apertures to ensure that the element of their subject that they are focusing in on totally captures the attention of the viewer of their images while the rest of the image is completely thrown out of focus.
Aperture on Lenses
Every lens has a limit on how large or how small the aperture can get. If you take a look at the specifications of your lens, it should say what the maximum (lowest f-number) and minimum apertures (highest f-number) of your lens are. The maximum aperture of the lens is much more important than the minimum, because it shows the speed of the lens. A lens that has an aperture of f/1.2 or f/1.4 as the maximum aperture is considered to be a fast lens, because it can pass through more light than, for example, a lens with a maximum aperture of f/4.0. That’s why lenses with large apertures are better suited for low light photography.
All lens apertures can be narrowed as much as you want. For example, every lens on the market today – regardless of manufacturer – can be set to f/16. However, the reverse is not true: every lens on the market cannot be opened up to f/1.4.
The limit to how wide the lens can open is called the maximum aperture. A lens with a wider maximum aperture lets in more light. The minimum aperture is not that important, because almost all modern lenses can provide at least f/16 as the minimum aperture, which is typically more than enough for everyday photography needs.
*Note that most lenses are at their sharpest around f/5.6 or f/8. However, many photographers are willing to trade some sharpness for the subject-isolating effects of a wider aperture.
There are two types of lenses: “fixed” (also known as “prime”) and “zoom”. While zoom lenses give you the flexibility to zoom in and out (most point and shoot cameras have zoom lenses) without having to move closer or away from the subject, fixed or prime lenses only have one focal length. Due to the complexity of optical design for zoom lenses, many of the consumer lenses have variable apertures. What it means, is that when you are fully zoomed out, the aperture is one number, while zooming in will increase the f-number to a higher number. For example, the Nikon 18-200mm lens has a variable maximum aperture of f/3.5-f/5.6. When zoomed fully out at 18mm, the lens has an aperture of f/3.5, while when fully zoomed in at 200mm, the lens has an aperture of f/5.6. The heavy, professional zoom lenses, on the other hand, typically have fixed apertures. For example, the Nikon 70-200mm f/2.8 lens has the same maximum aperture of f/2.8 at all focal lengths between 70mm and 200mm.
Why is this important? Because larger maximum aperture means that the lens can pass through more light, and hence, your camera can capture images faster in low-light situations. Having a larger maximum aperture also means better ability to isolate subjects from the background.
Next will be ISO
What is Shutter Speed?
Shutter speed is the amount of time that the lens stays open while taking a photo. Shutter speed is measured in seconds or fractions of seconds (1" is 1 second, 1/250 is 1 250th of a second). Most of the time, 1/60 or higher is used, anything under that and the camera should be placed on a tripod or image stabilizer should be used.
The shutter speeds available depend on your camera. Some go up to 1/4000 sec., and some go higher or lower. There is also the option for slower shutter speeds (1/60 or lower), and the BULB setting is simple: however long you press down the shutter button is how long the sensor stays open, which is useful if you want to use a longer shutter speed than what is available. I strongly recommend using a shutter remote or release cable when using slower shutter speeds, especially for the BULB setting as it will eliminate the risk of camera shake when pressing the shutter release button.
The shutter speeds available depend on your camera. Some go up to 1/4000 sec., and some go higher or lower. There is also the option for slower shutter speeds (1/60 or lower), and the BULB setting is simple: however long you press down the shutter button is how long the sensor stays open, which is useful if you want to use a longer shutter speed than what is available. I strongly recommend using a shutter remote or release cable when using slower shutter speeds, especially for the BULB setting as it will eliminate the risk of camera shake when pressing the shutter release button.
Choosing a Shutter Speed
What shutter speed to use completely depends on the subject and what you wish to achieve. Still objects don't need as fast of a shutter speed as a person running. Or stationary objects, 1/250 of a second or anything around that is a good choice, though if you are using a tripod you can go as low as you want.
Moving subjects you'll want 1/250 seconds of faster to freeze the motion. I prefer using 1/500 of a second or higher and for really fast subjects (like wildlife or cars), I like anything higher than 1/1000 of a second.
However, if you wish to caption motion blue (show the movement), use a slower shutter speed. Anything slower than 1/60 of a second will capture the motion of a moving subjects. Remember to use a tripod when using slower shutter speeds.
Slow shutter speeds are great for long exposure shots for things such as waterfalls, stars, fireworks, etc., as it creates a sense of motion. You can get pretty creative with shutter speeds.
Setting the Shutter Speed
When in Auto mode, the camera sets the elements for you (aperture, shutter speed and ISO). Semi-automatic modes set one part for you. When in Aperture Priority mode, you control the aperture but the camera will choose a shutter speed for you. In Shutter Priority mode, you choose the shutter speed and the camera does the rest. In Manual mode, you control all three (see Part 1 post).
To find what your shutter speed is set to, look through the view finder and it should be on the bottom left corner or look at the screen section on your camera (on the back of some cameras, but some have it on top by the shutter release button), where your information is found. You should see a fraction and then f/__ (#). The numbers before the f/__ (aperture) is the shutter speed.
An easy way to find your shutter speed is to set the camera to aperture priority mode and point your camera at a dark subject. Remember the numbers you see and then point it at a bright subject and which number changes is your shutter speed.
Filters
This is just a quick write up on filters, which will help with shutter speed in certain situations.
Neutral-Density (ND) Filters: These dark grey filters block the amount of light entering the lens and are available in a range of different strengths, each enabling the use of progressively slower shutter speeds.
-ND filters are especially useful when out in bright light and wanting a slow shutter speed (i.e. for waterfalls).
-If you don't have an ND filter, you can try using a very small aperture to get a slower shutter speed in bright light.
Very strong ND Filters, combined with small apertures and low ISO sensitivities, enable the use of shutter speeds that stretch for minutes, even in the middle of a clear summer day.
They’re routinely used to create minimalist long-exposure coastal pictures in which a rough sea resembles a polished ice rink.
Intrudction
What is the Exposure Triangle?
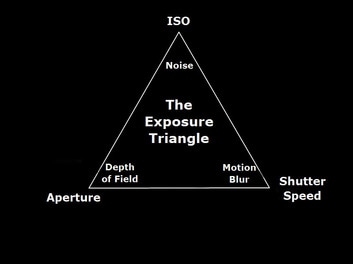
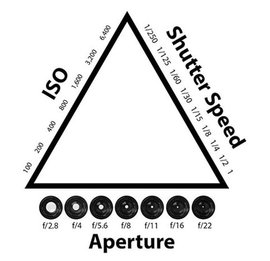
There are three elements that control what exposure you get while taking a picture; Shutter Speed, ISO and Aperture.
When in Manual mode, you control all three elements. When in Shutter Priority Mode, you control the shutter and the camera does the rest and in Aperture Priority Mode you control aperture and the camera controls the rest. The only true manual mode is Manual Mode, all other modes are considered automatic, even shutter and aperture priority modes which are semi-automatic.
Shutter Speed - the amount of time that the shutter is open
ISO - the measure of a digital camera sensor's sensitivity to light
Aperture - the size of the opening in the lens when a picture is taken
It is at the intersection of these three elements that an image's exposure is made. Most importantly: changing one elements settings will create a ripple affect and in turn will effect the other two elements. You have to have all three elements in mind during manual mode, especially when changing a setting.
Remember, each of these elements are aspects of light and how it enters and interacts with the camera.
Bringing It Together
Mastering the art of exposure is something that takes a lot of practice. In many ways it's a juggling act and even the most experienced photographers experiment and tweak their settings as they go. Keep in mind that changing each element not only impacts the exposure of the image, but each one also has an impact upon other aspects of it (i.e: aperture changes depth of field, shutter speed impacts how motion is captured and ISO changes the graininess of the shot (noise)).
The great thing with digital cameras is that they are a great way to learn about exposure. Take as many shots as you wish at no cost but with the different modes you can learn at your own pace. Automatic modes make the decisions for you and semi-automatic modes allow you you to make the decision on one or two of the elements. The highest you can go is Manual mode where you choose all the settings.
It's best to know your camera and each element of the exposure triangle prior to going full manual.
Colour Schemes
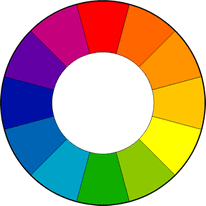
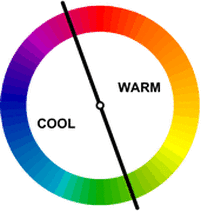
Photography is made up of certain elements and guidelines. But an important thing in any photo, is of course colour. Below is a photo of the colour wheel, which I'll be using to explain things. The colour wheel dates back to 1666.
Three primary colours, which are Blue, Red and Yellow. Every other colour out there are created by mixing these three colours together. Primary colours mixed together creates Secondary colours (Orange/Purple/Green) and when those are mixed together, they create Tertiary colours.
Warm vs Cool: Warm colour tones range from red to yellow and create a sense of warmth or heat in an image. Cool colour tones are usually mostly blues and gives an impression of coldness.
 |  |
Complimentary Colours
| Complimentary colorus are found opposite each other on the colour wheel. Blue/Orange and Red/Green I find are two of the more popular complementary colour schemes found. Using complementary colours in an image makes things stand out from one another. It can be good to use this scheme to isolate an object, but try avoiding using it in wide angle shots, like landscapes. Use this scheme carefully so it doesn't become jarring. The high contrast creates a vibrant look. | 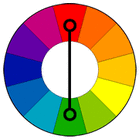 |
Analogous Colours
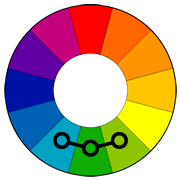 | Analogous colours are found next to each other on the colour wheel and often found in nature. They can create a sense of relaxation and blend nicely together. Analogous is great in wide angle shots, like landscapes. They give the image a calming effect. However, this is where we get a bit into warm vs cool. Try to not mix the two together. Keep warms together and cools together when doing Analogous colour schemes. Try to make sure there is enough contrast when using this scheme. Choose one colour to dominate and a second for support. The third color is used (along with black, white or gray) as an accent colour. |
Triadic Colours
| Triadic colours are found in a triangle form on the colour wheel. Usually one colour is dominant (used the most) and the other two are used to accent. This scheme offers contrast (balance between light and dark) and often give a sense of balance to an image. They tend to be quite vibrant, no matter the amount of saturation. They do provide contrast similar to complementary colours but appear more balanced. | 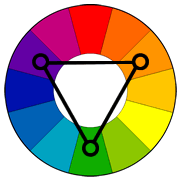 |
Monochromatic Colours
A monochromatic scene consists of varying shades of a single color. The key to a successful monochromatic image is to find scenes with good contrast throughout the image--you want the photo to have a dark version of the color, a light one and a good range of tones in between.
Conlusion
Complementary, Analogous and Triadic are the three main colour schemes. They are very useful in photography, but really in any art form. Colour influences the mood of an image and can make objects or points of interest stand out. However, be careful. When used incorrectly, they can ruin an image.
Author
Photographer & animal lover with a barn full of rabbits and a cat.
[email protected]
902-681-1213
Archives
January 2021
August 2019
December 2018
November 2018
September 2018
August 2018
June 2018
April 2018
March 2018
February 2018
January 2018
January 2017
 RSS Feed
